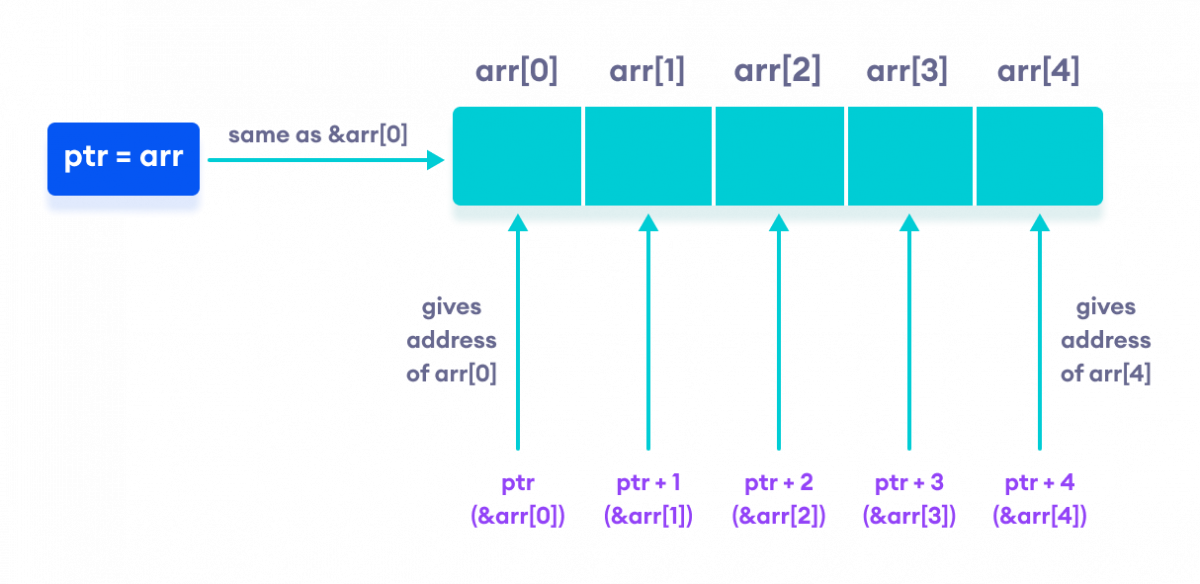
ptr + 1 is equivalent to &arr[1]; ptr + 2 is equivalent to &arr[2]; ptr + 3 is equivalent to &arr[3]; ptr + 4 is equivalent to &arr[4];
同樣,我們也可以說使用單個指針訪問元素。舉例:
1
2
3
4
5
6
// use dereference operator *ptr == arr[0]; *(ptr + 1) is equivalent to arr[1]; *(ptr + 2) is equivalent to arr[2]; *(ptr + 3) is equivalent to arr[3]; *(ptr + 4) is equivalent to arr[4];
假設我們已經初始化,ptr = &arr[2],然後:
1 2 3 4
ptr - 2 is equivalent to &arr[0];
ptr - 1 is equivalent to &arr[1];
ptr + 1 is equivalent to &arr[3];
ptr + 2 is equivalent to &arr[4];
// C++ Program to display address of each element of an array
#include<iostream> using namepsace std; intmain() { float arr[3]; // declare pointer variable float *ptr; cout << "Displaying address using arrays: " << endl; // use for loop to print addresses of all array elements for (int i = 0; i < 3; ++i) { cout << "&arr[" << i << "] = " << &arr[i] << endl; } // ptr = &arr[0] ptr = arr; cout << "\nDisplaying address using pointers: " << endl; // use for loop to print addresses of all array elements // using pointer notation for (int i = 0; i < 3; ++i) { cout << "ptr + " << i << " = " << ptr + i << endl; } return0; }
intmain(){ int num; cout << "Enter total number of students: "; cin >> num; float* ptr; // memory allocation of num number of floats ptr = newfloat[num]; cout << "Enter GPA of students." << endl; for (int i = 0; i < num ++i) { cout << "Student" << i + 1 << ": "; cin >> *(ptr + i); } cout << "\nDisplaying GPA of students." << endl; for (int i = 0; i < num; ++i) { cout << "Student" << i + 1 << " :" << *(ptr + i) << endl; } // ptr memory is released delete [] ptr; return0; }
/* OUTPUT Enter total number of students: 4 Enter GPA of students. Student1: 3.6 Student2: 3.1 Student3: 3.9 Student4: 2.9 Displaying GPA of students. Student1 :3.6 Student2 :3.1 Student3 :3.9 Student4 :2.9 */
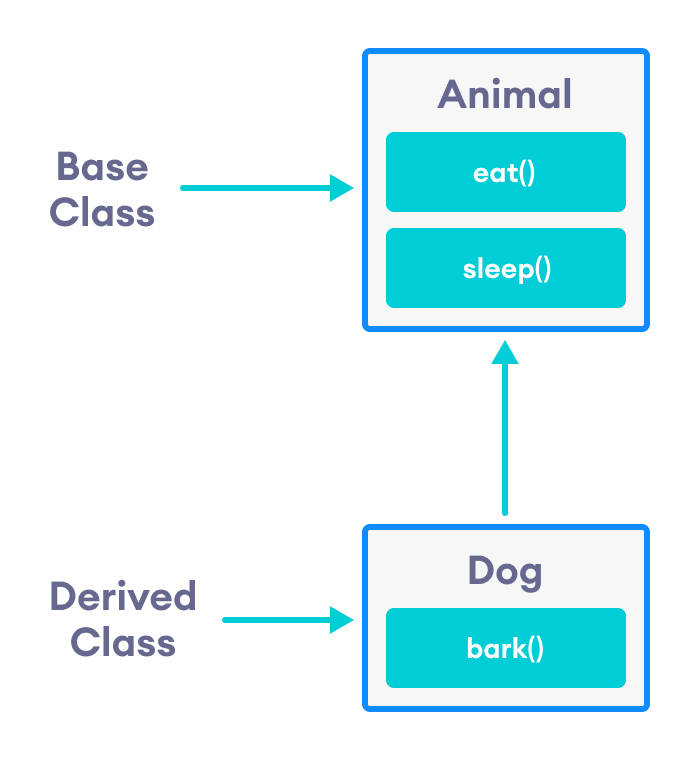
// base class classAnimal { public: voideat(){ cout << "I can eat!" << endl; } voidsleep(){ cout << "I can sleep!" << endl; } };
// derived class classDog :public Animal { public: voidbark(){ cout << "I can bark! Woof woof!!" << endl; } };
intmain(){ // Create object of the Dog class Dog dog1; // Calling members of the base class dog1.eat(); dog1.sleep(); // Calling member of the derived class dog1.bark(); return0; }
/* OUTPUT I can eat! I can sleep! I can bark! Woof woof!! */
dog1可以訪問基類Animal的所有成員,因為Dog是Animal的派生。
1
2
3
// Calling members of the Animal class
dog1.eat();
dog1.sleep();
// base class classAnimal { private: string color; protected: string: type; public: voideat(){ cout << "I can eat!" << endl; } voidsleep(){ cout << "I can sleep!" << endl; } voidsetColor(string clr){ color = clr; } stringgetColor(){ return color; } };
// derived class classDog :public Animal { public: voidsetType(string yp){ type = tp; } voiddisplayInfo(string c){ cout << "I am a " << type << endl; cout << "My color is " << c << endl; } voidbark(){ cout << "I can bark! Woof woof!!" << endl; } };
intmain(){ // Create object of the Dog class Dog dog1 // Calling members of the base class dog1.eat(); dog1.sleep(); dog1.setColor("black"); // Calling member of the derived class dog1.bark(); dog1.setType("mammal"); // Using getColor() of dog1 as argument // getColor() returns string data dog1.displayInfo(dog1.getColor()); return0; }
/* OUTPUT I can eat! I can sleep! I can bark! Woof woof!! I am a mammal My color is black */
// C++ program to demonstrate the working of protected inheritance
#include<iostream> usingnamespacestd;
classBase { private: int pvt = 1; protected: int prot = 2; public: int pub = 3; // function to access private member intgetPVT(){ return pvt; } };
classProtectedDerived :protected Base { public: // function to access protected member from Base intgetProt(){ return prot; } // function to access public member from Base intgetPub(){ return pub; } };
// C++ program to demonstrate the working of private inheritance
#include<iostream> usingnamespacestd;
classBase { private: int pvt = 1; protected: int prot = 2; public: int pub = 3; // function to access private member intgetPVT(){ return pvt; } };
classPrivateDerived :private Base { public: // function to access protected member from Base intgetProt(){ return prot; } // function to access private member intgetPub(){ return pub; } };
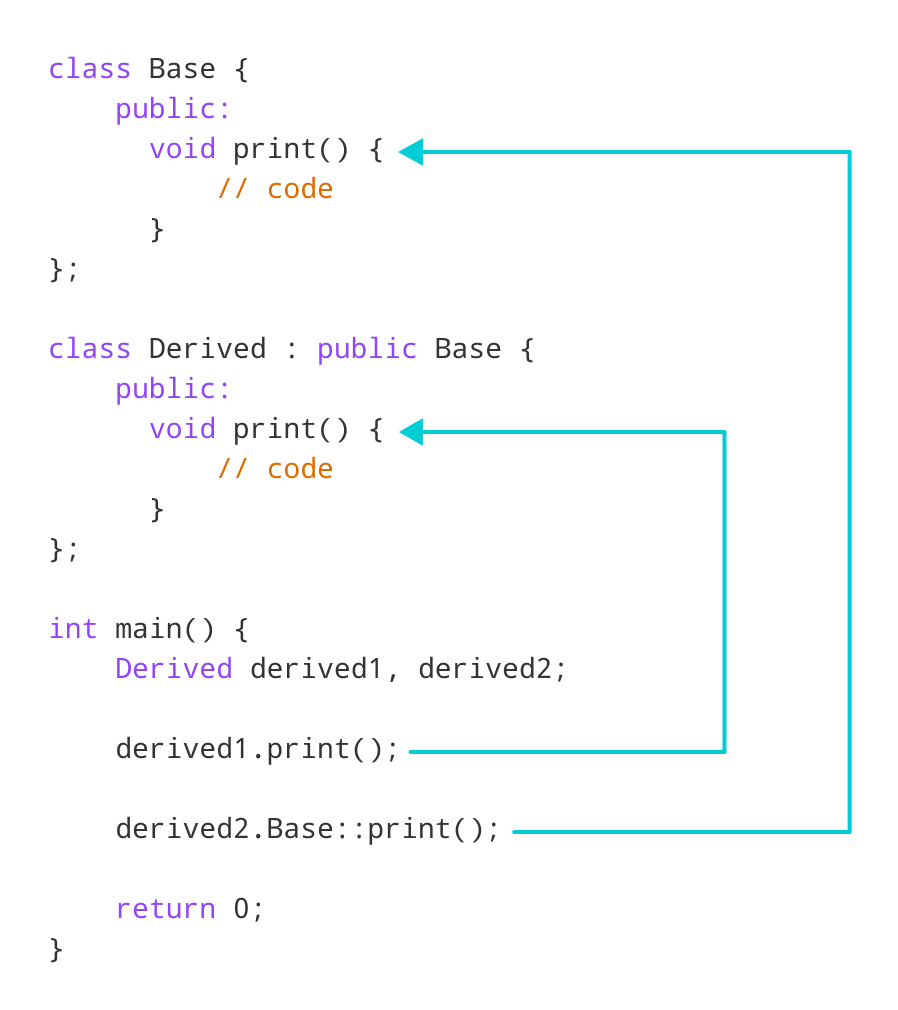
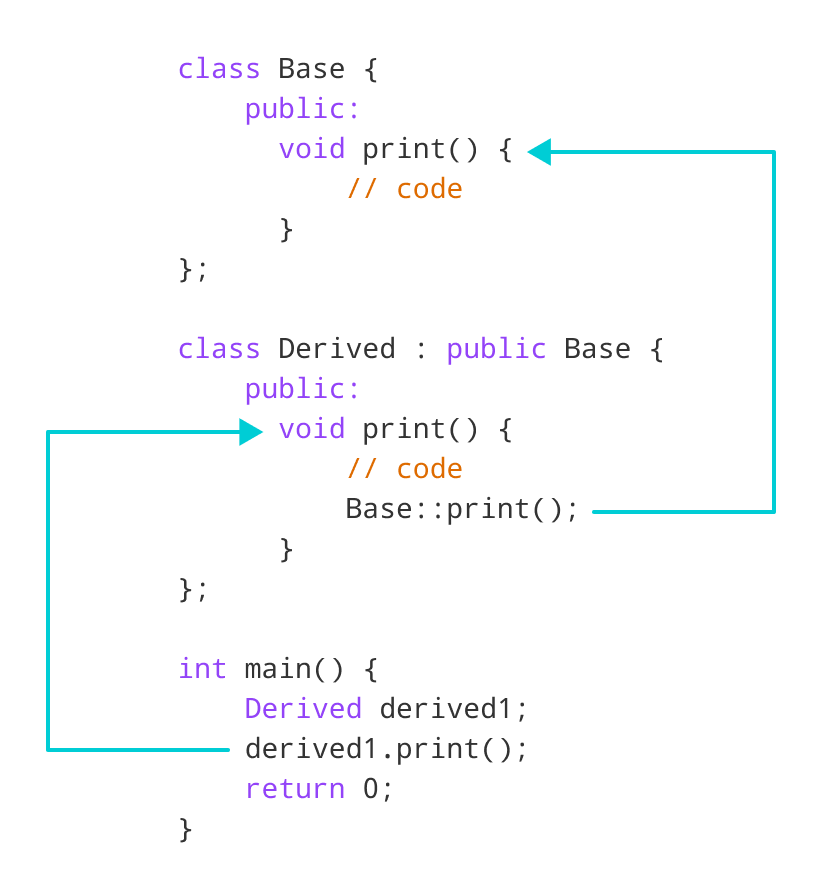
intmain(){ Derived derived1; // pointer of Base type taht points to derived1 Base* ptr = &derived1; // call function of Base class using ptr ptr->print(); return0; }
/* OUTPUT Base Function */
在這個程序中,我們創建了Base的指針ptr,這個指針指向Derived對象的derived1。
1
2
// pointer of Base type that points to derived1 Base* ptr = &derived1;
當我們使用指針調用print()函數,它會調用Base被覆蓋的函數。
1
2
// call function of Base class using ptr
ptr->print();
// Add members of two different classes using friend functions
#include<iostream> usingnamespacestd;
// forward declaration classClassB;
classClassA { public: // constructor to initialize numA to 12 ClassA() : numA(12) {} private: int numA; // friend function declaration friendintadd(ClassA, ClassB); };
classClassB { public: // constructor to initialize numB to 1 ClassB() : numB(1) {} private: int numB; // friend function declaration friendintadd(ClassA, ClassB); };
// access members of both classes intadd(ClassA objectA, ClassB objectB){ return (objectA.numA + objectB.numB); }
// C++ program to demonstrate the working of friend class
#include<iostream> usingnamespacestd;
// forward declaration classClassB;
classClassA { private: int numA; // friend class declaration friendclassClassB; public: // constructor to initialize numA to 12 ClassA() : numA(12) {} };
classClassB { private: int numB; public: // constructor to initialize numB to 1 ClassB() : numB(1) {} // member function to add numA // from ClassA and numB from ClassB intadd(){ ClassA objectA; return objectA.numA + numB; } };
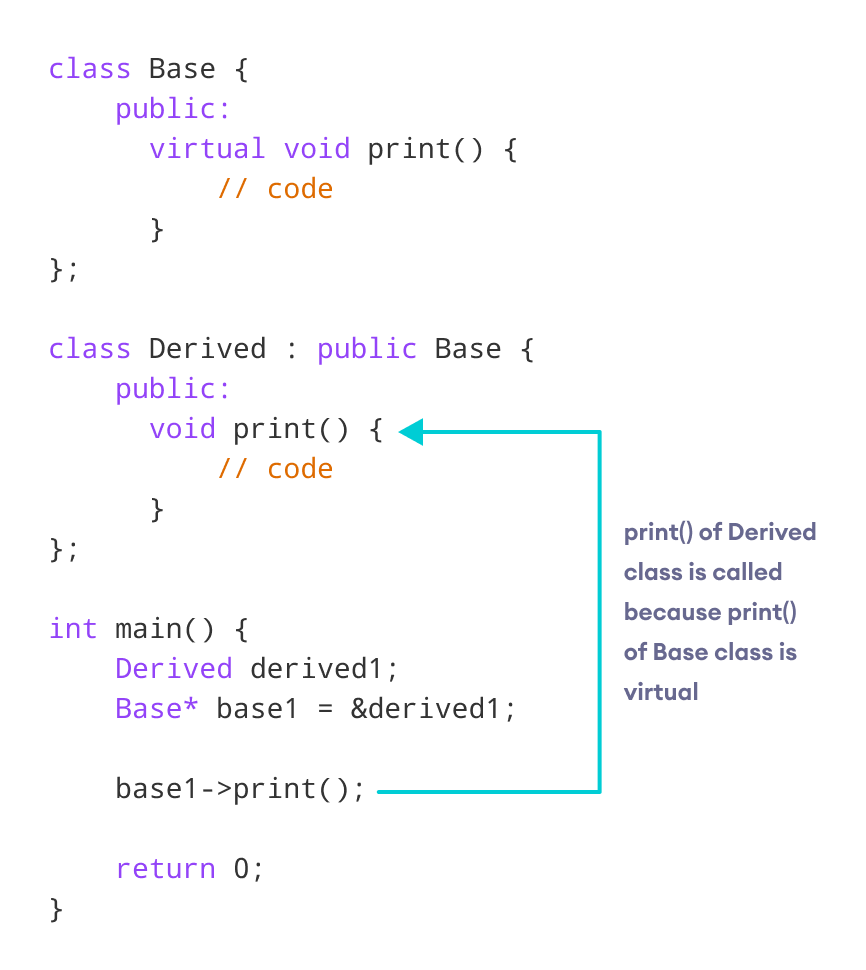
intmain(){ Derived derived1; // pointer of Base type that points to derived1 Base* base1 = &derived1; // calls member function of Derived class base1->print(); return0; }
// If two characters are passed to function template, character with larger ASCII value is displayed.
#include<iostream> usingnamespacestd;
// template function template <classT> T Large(T n1, T n2) { return (n1 > n2) ? n1 : n2; }
intmain() { int i1, i2; float f1, f2; char c1, c2; cout << "Enter two integers: \n"; cin >> i1 >> i2; cout << Large(i1, i2) << " is larger." << endl; cout << "\n Enter two floating-point numbers: \n"; cin >> f1 >> f2; cout << Large(f1, f2) << " is larger." << endl; cout << "\nEnter two characters:\n"; cin >> c1 >> c2; cout << Large(c1, c2) << " has larger ASCII value"; return0; }
/* OUTPUT Enter two integers: 5 10 10 is larger. Enter two floating-point numbers: 12.4 10.2 12.4 is larger. Enter two characters: z Z z has larger ASCII value. */
/* OUTPUT Before passing data to function template. i1 = 1 i2 = 2 f1 = 1.1 f2 = 2.2 c1 = a c2 = b After passing data to function template. i1 = 2 i2 = 1 f1 = 2.2 f2 = 1.1 c1 = b c2 = a */
/* OUTPUT Int results: Numbers are: 2 and 1. Addition is: 3 Subtraction is: 1 Product is: 2 Division is: 2 Float results: Numbers are: 2.4 and 1.2. Addition is: 3.6 Subtraction is: 1.2 Product is: 2.88 Division is: 2 */